Home
How to Make Fries in an Oven That Are Actually Crispy and Delicious
To achieve restaurant-quality results in your home oven, you must address three critical factors: starch removal, moisture control, and heat transfer . The most effective method involves soaking cut potatoes in cold water to remove surface starch, followed by a brief boil in water with a splash of vinegar to stabilize the potato's structure. Finally, bake the fries in a single layer on a preheated baking sheet at a high temperature (425°F or higher). This combination ensures a fluffy interior and a deeply golden, crunchy exterior without the need for a deep fryer.
Why Most Homemade Oven Fries Turn Out Soggy
If you have ever pulled a tray of limp, pale, or greasy potatoes out of the oven, you are not alone. Achieving the perfect crunch in a dry-heat environment like an oven is significantly more challenging than deep frying. The primary culprit is usually surface starch . When potatoes are cut, they release starch that acts like a glue. If this starch isn't washed away, it prevents the exterior from crisping and causes the fries to stick together, trapping steam between them.
According to culinary research, moisture is the number one enemy of crispiness. When you place a wet potato in a hot oven, the heat first has to evaporate that surface water before it can begin the browning process (the Maillard reaction). By the time the surface is dry enough to crisp, the interior has often overcooked, leading to a mushy texture. This "moisture trap" is exacerbated by overcrowding the pan. If the fries are touching, the water vapor escaping from one fry is absorbed by its neighbor, effectively steaming the potatoes rather than roasting them.
Furthermore, many home cooks fail to account for the lack of oil conductivity. In a deep fryer, hot oil surrounds the potato, transferring heat instantly and evenly. In an oven, air is the primary conductor, which is far less efficient. To compensate, you must use enough oil to coat the surface and ensure the baking sheet itself is hot enough to sear the potato on contact. Understanding these scientific hurdles is the first step toward mastering the oven-baked fry.
Choosing the Right Potatoes for Your Oven Fries
Not all potatoes are created equal when it comes to high-heat roasting. The starch-to-water ratio in a potato determines how it will react to the oven's heat. For the classic French fry experience, most experts point toward the Russet potato, but there are compelling reasons to consider alternatives depending on your texture preferences.
| Potato Type | Starch Level | Interior Texture | Skin Thickness | Best Use Case |
|---|---|---|---|---|
| Russet (Idaho) | High | Fluffy & Mealy | Thick | Classic, crunchy restaurant-style fries. |
| Yukon Gold | Medium | Creamy & Waxy | Thin | Tender fries with a rich, buttery flavor. |
| Red Bliss | Low | Dense & Firm | Very Thin | Roasted wedges; generally not ideal for fries. |
The Russet potato is widely regarded as a top choice because its high starch content allows for a significant contrast between the crust and the core. However, some enthusiasts argue that Yukon Golds offer a superior mouthfeel. While Russets can sometimes feel "caky" or dry, Yukon Golds maintain a velvety interior that many find more satisfying. If you prefer a fry that holds its shape perfectly and offers a more substantial bite, the Yukon Gold is a strong contender.
The Secret Step for Restaurant Quality Results
If you want to elevate your fries from "good for home" to "professional grade," you need to adopt the Vinegar Boil Hack . This technique, championed by culinary experts like Ann Taylor Pittman, involves par-boiling the cut potatoes in water spiked with a small amount of white vinegar before they ever touch the oven.
The 10-Minute Vinegar Hack: Add 1 tablespoon of white vinegar for every quart of water. Boil the potato strips for about 8–10 minutes until they are tender but not falling apart. The vinegar prevents the pectin in the potato from breaking down too quickly, allowing the fry to maintain its structural integrity while the starch on the surface gelatinizes for a premier crunch.
This method serves two purposes. First, it ensures the interior of the fry is fully cooked and fluffy, so the oven time can focus solely on crisping the exterior. Second, boiling in salted water is the only way to season the inside of the potato. Since potatoes are incredibly dense, surface salt added after baking often falls off or tastes one-dimensional. By par-boiling in a brine, you ensure every bite is perfectly seasoned from the core outward.
How to Prepare Your Potatoes for Maximum Crunch
Preparation is where the battle for crispiness is won or lost. Follow these steps to ensure your potatoes are ready for the high-heat environment of the oven.
How to Cut Your Potatoes into Even Strips
Uniformity is not just about aesthetics; it is about physics. If your fries are different sizes, the thin ones will burn while the thick ones remain raw in the middle. Aim for batons that are roughly 1/3 to 1/2 inch thick. If you prefer steak fries, you can go up to 3/4 inch, but keep in mind that thicker fries require longer cooking times and are more prone to sogginess if not handled correctly.
Why You Must Soak Your Potatoes in Cold Water
After cutting, place the strips in a large bowl of cold water. You will notice the water becomes cloudy almost immediately—that is the excess starch leaving the potato. A 30-minute soak is the standard recommendation, though some chefs suggest up to 3 hours for the best results. This step is non-negotiable if you want to avoid the "gluey" texture that plagues many homemade recipes. As noted by Well Plated , this process is essential for achieving that distinct fry snap.
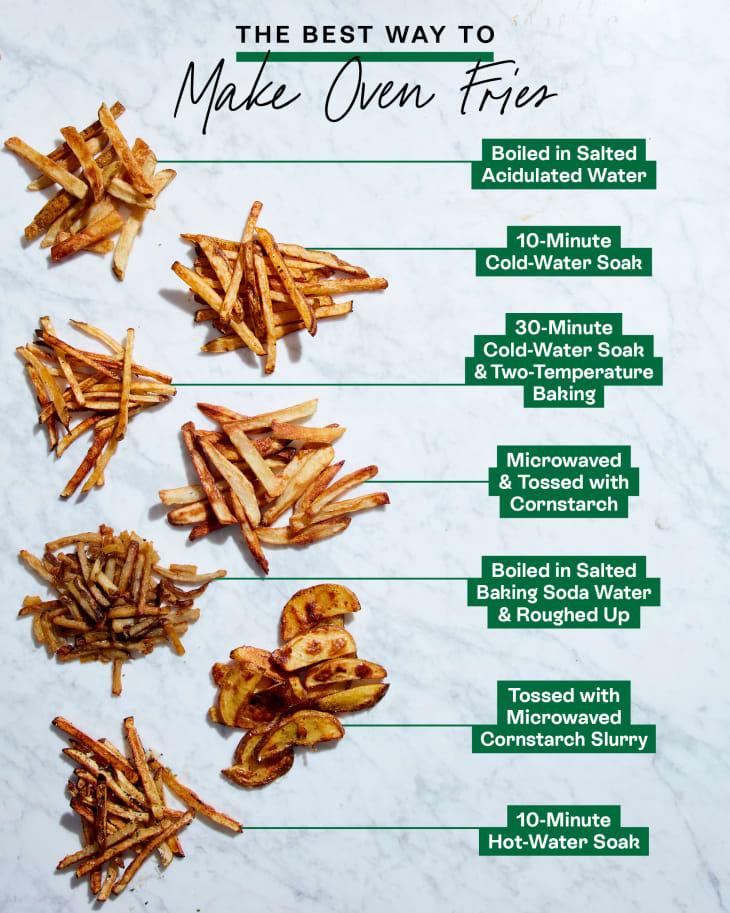
Image source: Cubby
How to Dry Potatoes Using a Salad Spinner
This is a pro-level tip that many home cooks overlook. Patting potatoes dry with a paper towel is often insufficient because moisture hides in the pores of the potato. A salad spinner uses centrifugal force to pull every last drop of water away from the surface. If you don't have a salad spinner, lay the potatoes out on a clean kitchen towel and use a second towel to aggressively pat them dry. The drier the potato, the faster the oil can begin the crisping process.
How to Season Your Fries for the Best Flavor
Seasoning is more than just salt; it involves creating a flavorful "crust" that adheres to the potato. The choice of oil and the timing of your spices can make a significant difference in the final product.
- Oil Selection: Use an oil with a high smoke point. Avocado oil, grapeseed oil, or light olive oil are excellent choices. Avoid extra virgin olive oil for this purpose, as its low smoke point can lead to a bitter, burnt flavor at 425°F.
- The Coating Method: Don't just drizzle oil over the fries on the pan. Toss them in a large bowl with the oil and spices first. This ensures every millimeter of the potato is coated, which is vital for even heat conduction.
- Spice Timing: Salt, black pepper, garlic powder, and paprika are classic additions. However, if you are using dried herbs like parsley or oregano, add them in the last 5 minutes of baking to prevent them from burning and becoming acrid.
Some recipes suggest a light dusting of cornstarch or potato starch after oiling. While this is a popular choice for extra crunch, it can sometimes result in a "powdery" mouthfeel if not executed perfectly. If you choose to use cornstarch, use no more than 1 teaspoon per two large potatoes and ensure it is thoroughly incorporated into the oil coating.
How to Arrange Fries to Avoid Steaming
The arrangement of your fries on the baking sheet is arguably the most important factor in the final 20 minutes of cooking. Even the best-prepared potato will turn soggy if it is crowded.
The Single Layer Rule
Every single fry needs its own "breathing room." If fries are overlapping or touching, they will steam each other. Use two baking sheets if necessary. It is better to cook in batches or use more equipment than to ruin the texture by overcrowding. A good rule of thumb is to leave at least a quarter-inch of space between each baton.
Why You Should Preheat Your Baking Sheet
Just as a chef preheats a cast-iron skillet before searing a steak, you should place your empty baking sheet in the oven while it reaches temperature. When you toss the cold, oiled potatoes onto a screaming-hot pan, the contact creates an immediate sear. This prevents the potatoes from sticking and jumpstarts the browning of the bottom side, which is usually the hardest part to get crispy.
The Best Temperature and Timing for Baking
Timing and temperature are the final variables in the crispy fry equation. Most recipes fail because they stay at a single, moderate temperature for the entire duration.
- The Initial Roast (375°F): If you haven't par-boiled your potatoes, start at a slightly lower temperature for the first 15–20 minutes. This allows the heat to penetrate the center of the potato without burning the outside.
- The High-Heat Finish (425°F - 450°F): For the final 10–15 minutes, crank the heat up. This high-intensity thermal energy is what creates the "blistered" skin and deep golden color. If your oven has a convection (fan) setting, this is the time to use it.
- The Flip: Halfway through the high-heat phase, use a wide spatula to flip the fries. This ensures that both sides benefit from the direct contact with the hot metal of the baking sheet.
For those using convection ovens, remember to reduce the suggested temperature by about 25°F. The moving air in a convection oven accelerates evaporation and browning, so a standard 425°F recipe might require only 400°F in a fan-assisted environment to avoid burning.
How to Fix Common Oven Fry Problems
This usually happens because the pan wasn't hot enough or there wasn't enough oil. Use non-stick foil or a well-seasoned baking sheet, and always preheat the pan before adding the potatoes.
Your fries are likely cut unevenly, or your oven has hot spots. Use an oven thermometer to check for accuracy and ensure your cuts are uniform.
Fries lose crispness because internal steam migrates to the surface. Serve them immediately on a wire rack rather than a flat plate to allow air to circulate underneath.
Healthy Alternatives and Variations
While traditional fries are a treat, you can adapt this method for different dietary needs. For a lower-calorie version, some home cooks use whipped egg whites as a binder for spices instead of oil. While the texture is different, it provides a surprisingly satisfying crunch.
Sweet potatoes are another popular alternative, though they require a different approach. Because sweet potatoes contain more sugar and less starch than Russets, they burn much faster. To make successful sweet potato fries, lower the oven temperature to 400°F and increase the cooking time. The vinegar boil is less effective here; instead, a light coating of cornstarch is often necessary to achieve any significant crunch.
Frequently Asked Questions
- Can I make fries in the oven without soaking?
- You can, but the results will likely be inferior. Without soaking, the surface starch remains, which often leads to fries that are limp, dark brown (due to sugar caramelizing too fast), and prone to sticking to the baking sheet. If you are in a rush, even a 10-minute soak is better than none at all.
- How long do you bake fries at 400 degrees?
- At a steady 400°F, standard-cut fries typically take 25 to 35 minutes. However, for the best texture, we recommend starting at 375°F and finishing at 425°F. The total time remains similar, but the texture contrast is much more pronounced with the temperature shift.
- What is the best way to reheat leftover fries?
- Never use a microwave, as it will turn the potatoes into a rubbery mess. Instead, place them in a single layer in a 400°F oven or an air fryer for 3–5 minutes. A dry non-stick skillet over medium-high heat also works exceptionally well for restoring the crunch to a small batch of leftovers.
- Why do my fries turn brown but stay soft?
- This is usually caused by "cold-stored" potatoes. When potatoes are stored in the refrigerator, their starches convert into sugars. These sugars burn quickly in the oven (turning the fry dark brown) before the starch has a chance to crisp up. Always store your potatoes in a cool, dark pantry—never the fridge.
- Can you freeze homemade oven fries?
- Yes. To do this properly, follow the vinegar boil and drying steps, then toss them in a small amount of oil. Spread them on a tray and freeze them individually (par-freezing) before transferring them to a freezer bag. They can be baked directly from frozen at 425°F for 20–25 minutes.
Key Takeaways for Perfect Oven Fries
Mastering the oven fry is a matter of technique over luck. By following these core principles, you can produce a side dish that rivals any restaurant offering.
- Choose Russets for the classic fluffy-to-crunchy ratio, or Yukon Golds for a creamier interior.
- Soak and Dry your potatoes thoroughly to remove starch and surface moisture—a salad spinner is a top-tier tool for this.
- Use the Vinegar Boil to stabilize the potato structure and season the interior before baking.
- Preheat your baking sheet to ensure an immediate sear and prevent sticking.
- Never overcrowd the pan ; give each fry space to ensure roasting rather than steaming.
- Use a two-temperature approach to cook the inside perfectly and blister the outside for maximum crunch.
Start by trying the vinegar boil method with your next batch of Russets to see the immediate difference in structural integrity and crunch.